Lately my husband and I have been talking almost every night about our future. We are praying for guidance for what to do next. Neither of us have a clear understanding of where God wants is to be in 1 year, 2 years, 4 years...
I want so desperately to have my own classroom. I graduated last May, and didn't know exactly what type of teaching job I wanted. I suppose I still do not know entirely, but I have a great longing for a lower elementary classroom. Whether that is where God will put me or not I do not know.
I feel a bit like I would be abandoning my heart for children with disabilities if I had a general Ed classroom.
There have been so many things lately that have sparked my passion for special Ed. I realize how much it hurts when I see the word, "retard" plastered somewhere, or realize the building I am sitting in is not wheelchair accessible. I wish I could be the teacher when I sit in on the IEP meeting, I smile when I see a child in the grocery store who is feeling the various textures of the fruit. My heart aches when I see the tears of a mother who's child with autism's needs are not being met in school. It sickens me when I hear the excuses an administrator will make for her staff, who are not willing to try new methods of teaching for a student with sensory needs.
Thank you Lord for the passions you have put in my heart. Thank you for the gifts and abilities you have given me. Help me to continue to work on my patience and ability to communicate in various ways. I pray you will guide me into the position that you have created especially for me. Help me to be open and willing to follow your guidance.
Wednesday, March 28, 2012
Monday, March 12, 2012
DIY Kindle Cover (try two)
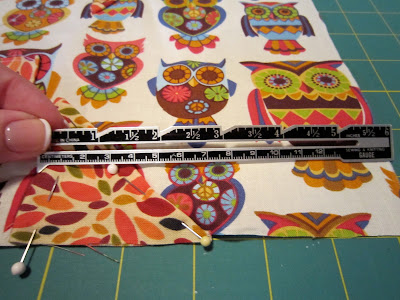
So I had so much fun making the owl Kindle cover, I wanted to try another one! One of my coworkers has a kindle so a made one for her. I am pretty pleased with the way it turned out.
I made a few changes, but not too major. I made the pocket vertical this time, and I topstitched along the diagonals of the corner pieces. All in all successful I'd say.
I made a few changes, but not too major. I made the pocket vertical this time, and I topstitched along the diagonals of the corner pieces. All in all successful I'd say.
Saturday, March 10, 2012
DIY Owl Kindle Cover Tutorial
I have been meaning to make a Kindle cover for my sister-in-law for months now. But it has taken me a long time to figure out the measurements for it. I am excited to say, I DID IT!! It is finished! and I am very pleased with how it turned out!!

I searched and searched the internet, Pinterest, blogspot, blogger... everywhere to find a good tutorial for a Kindle cover. But NONE could be found. I think everyone wanted to save their secrets to make money selling their covers... So- after all the laboring, (and failures of covers too small) I thought I would share with the world the steps of how I did it, so maybe someone out there wouldn't have to suffer as much as I did trying to find measurements!! I wanted a cover that had some padding, but also a cardboard inside. Also I wanted a velcro side closure, and a bottom pocket, instead of the side pockets I saw on many covers. So I kind of gathered little helpful hints from various sources and compiled them. I'm kinda a big believer in "a picture is worth a thousand words" so this post has way too many pictures, but hopefully the instructions are clear enough to follow.
If you try this, or read this, or find this helpful, or find this confusing... Your comments are welcomed! Please, let me know how I can improve this post! I am still learning this whole blog/tutorial thing!
Materials:
-two different prints of fabric (that coordinate)
-thread
-velcro (i bought velcro sticky squares from a craft store)
-padding of some sort (i used a piece of scrap fabric, that was a microfleece, so mine is a bit smaller than that)
-cardboard (I suggest using the inside of a three ring binder, it is stronger and thinner than regular cardboard, without the bubbles of air in it.)
- and of course a sewing machine and some determination!
Getting started:
You will need to cut out the following pieces:
 A: 8 1/2 inches x 11 1/2 inches (cut 2 of main fabric, 1 of "padding" fabric)
B: 8 inches x 5 inches (cut 1 of complimentary fabric)
C: 8 inches x 1 1/2 inches (cut 1 of complimentary fabric)
D: 3 inches x 3 inches (cut 4 of complimentary fabric)
E: 7 5/8 inches x 5 inches (cut 2 of cardboard)
Strap and Velcro Construction:
1. Fold Piece C in half to find the middle, place rough velcro square on the fabric (about 1/4 inch from the fold)
2. open up the fabric and sew around the edge of velcro.

3. Fold in half, right sides together and sew top and bottom edges with a 1/8th inch seam allowance.

4. Turn strap right side out. (I use a pin to pull the corners out as far as I can)
5. Finish edges by sewing a stay stitch around edges to make strap lay flat. Your strap should now look something like this:

6. Sew soft Velcro square to outside piece A, 2 inches from right side, in the middle.

Pocket construction:
1. Fold piece B in half (hamburger style), right sides together. With fold on top, sew down the right side.

2. Turn fabric. With right sides out and fold on top, sew a topstitch/staystitch along the fold and right side seam.

3. Match bottom and left raw edges of piece B to bottom left corner raw edges of inside piece A(NOT the A piece that has the velcro on it) (right sides both up)

4. Stitch-in-the-ditch (sew following topstiching line) on the RIGHT SIDE of the pocket only.
Corners Construction:
1. Fold two D pieces in half diagonally, right sides together. Sew ONE raw edge on each with 1/4 inch seam allowance.


2. Turn right sides out. (again, I used a pin to pull out the corner/point as far as I can.)
3. Match top and bottom raw edges to piece A. Measure so that seamed edges of D pieces are 6 inches from right side of piece A. Sew (1/8 inch seam allowance) down left sides of D pieces.

4. Fold remaining two D pieces in half diagonally WRONG sides together.
5. Match raw edges/corners to right two corners of piece A. Pin.

Putting it all together:
-Layer the pieces in the following order bottom first:
1. Inside piece A (with pocket and corners attached) RIGHT SIDE UP
 2. Strap, piece C (with velcro side down and to the left) raw edge should stick out of the right side of piece A about 1 inch, center up and down.
 3. Outside piece A (with velcro piece attached and on the left side) RIGHT SIDE DOWN
4. Place lining on top. (mine does not match in size because i used a scrap piece.)


- Pin, matching edges (again, my padding piece is smaller because it is a scrap) (except for strap piece, mine is a little crooked in the above pic)
- Starting at the top in the center, moving to the right, sew around the outside with a 1/4 inch seam allowance. (I match the edge of the fabric with the edge of my pressure foot).


-Stop when you get to the top left corner, so you leave a hole on the top left half of the cover.
- Clip the corners of your seam allowance, so it will lay flat better.
- Turn the cover, so right sides are out!

You are so close!! Just a few more things!
Finishing Touches:
1. I rounded the outside corners of the cardboard, just to make them fit a little better.

2. Insert the cardboard pieces in through the hole on the top left of the cover.
Place them in-between the outside piece A and the padding piece.

3. This next step is kind of tricky, turn in the top open edge, and hand sew closed. I pinned it so it laid flat, then hand sewed it.


4. Finally, spread the two piece of cardboard as far to the outside edges as possible. Sew (stitch in the ditch) down the left edge of the two center corner pieces, making a line down the center of the entire cover. This will help keep the cardboard and lining/padding pieces in place.
5. If you would like, you can embellish with a button on the strap.
ENJOY!!!


I searched and searched the internet, Pinterest, blogspot, blogger... everywhere to find a good tutorial for a Kindle cover. But NONE could be found. I think everyone wanted to save their secrets to make money selling their covers... So- after all the laboring, (and failures of covers too small) I thought I would share with the world the steps of how I did it, so maybe someone out there wouldn't have to suffer as much as I did trying to find measurements!! I wanted a cover that had some padding, but also a cardboard inside. Also I wanted a velcro side closure, and a bottom pocket, instead of the side pockets I saw on many covers. So I kind of gathered little helpful hints from various sources and compiled them. I'm kinda a big believer in "a picture is worth a thousand words" so this post has way too many pictures, but hopefully the instructions are clear enough to follow.
If you try this, or read this, or find this helpful, or find this confusing... Your comments are welcomed! Please, let me know how I can improve this post! I am still learning this whole blog/tutorial thing!
Materials:
-two different prints of fabric (that coordinate)
-thread
-velcro (i bought velcro sticky squares from a craft store)
-padding of some sort (i used a piece of scrap fabric, that was a microfleece, so mine is a bit smaller than that)
-cardboard (I suggest using the inside of a three ring binder, it is stronger and thinner than regular cardboard, without the bubbles of air in it.)
- and of course a sewing machine and some determination!
Getting started:
You will need to cut out the following pieces:
 A: 8 1/2 inches x 11 1/2 inches (cut 2 of main fabric, 1 of "padding" fabric)
B: 8 inches x 5 inches (cut 1 of complimentary fabric)
C: 8 inches x 1 1/2 inches (cut 1 of complimentary fabric)
D: 3 inches x 3 inches (cut 4 of complimentary fabric)
E: 7 5/8 inches x 5 inches (cut 2 of cardboard)
Strap and Velcro Construction:
1. Fold Piece C in half to find the middle, place rough velcro square on the fabric (about 1/4 inch from the fold)
2. open up the fabric and sew around the edge of velcro.

3. Fold in half, right sides together and sew top and bottom edges with a 1/8th inch seam allowance.

4. Turn strap right side out. (I use a pin to pull the corners out as far as I can)
5. Finish edges by sewing a stay stitch around edges to make strap lay flat. Your strap should now look something like this:

6. Sew soft Velcro square to outside piece A, 2 inches from right side, in the middle.

Pocket construction:
1. Fold piece B in half (hamburger style), right sides together. With fold on top, sew down the right side.

2. Turn fabric. With right sides out and fold on top, sew a topstitch/staystitch along the fold and right side seam.

3. Match bottom and left raw edges of piece B to bottom left corner raw edges of inside piece A(NOT the A piece that has the velcro on it) (right sides both up)

4. Stitch-in-the-ditch (sew following topstiching line) on the RIGHT SIDE of the pocket only.
Corners Construction:
1. Fold two D pieces in half diagonally, right sides together. Sew ONE raw edge on each with 1/4 inch seam allowance.


2. Turn right sides out. (again, I used a pin to pull out the corner/point as far as I can.)
3. Match top and bottom raw edges to piece A. Measure so that seamed edges of D pieces are 6 inches from right side of piece A. Sew (1/8 inch seam allowance) down left sides of D pieces.


4. Fold remaining two D pieces in half diagonally WRONG sides together.
5. Match raw edges/corners to right two corners of piece A. Pin.

Putting it all together:
-Layer the pieces in the following order bottom first:
1. Inside piece A (with pocket and corners attached) RIGHT SIDE UP


4. Place lining on top. (mine does not match in size because i used a scrap piece.)


- Pin, matching edges (again, my padding piece is smaller because it is a scrap) (except for strap piece, mine is a little crooked in the above pic)
- Starting at the top in the center, moving to the right, sew around the outside with a 1/4 inch seam allowance. (I match the edge of the fabric with the edge of my pressure foot).


-Stop when you get to the top left corner, so you leave a hole on the top left half of the cover.
- Clip the corners of your seam allowance, so it will lay flat better.
- Turn the cover, so right sides are out!

You are so close!! Just a few more things!
Finishing Touches:
1. I rounded the outside corners of the cardboard, just to make them fit a little better.

2. Insert the cardboard pieces in through the hole on the top left of the cover.
Place them in-between the outside piece A and the padding piece.

3. This next step is kind of tricky, turn in the top open edge, and hand sew closed. I pinned it so it laid flat, then hand sewed it.


4. Finally, spread the two piece of cardboard as far to the outside edges as possible. Sew (stitch in the ditch) down the left edge of the two center corner pieces, making a line down the center of the entire cover. This will help keep the cardboard and lining/padding pieces in place.
5. If you would like, you can embellish with a button on the strap.
ENJOY!!!


Friday, March 9, 2012
Bible Reading
So we are now into March. It has been two and a half months since I joined the group reading through the Bible for their New Year's resolution.
I love it.
I need to be honest, the past two weeks I have consistently been about 5 days behind. A while ago I was in Chicago for an unexpected funeral, and fell behind. It has been tough trying to catch up. But I am getting closer.
I find it so enjoyable to read the stories in the order they happened. It just brings it all together. Right now I am at the end of Numbers. It really is frustrating to read over and over, "the Israelites grumbled". I totally understand how angry God must have been with them! But it is so interesting to hear Moses plead on their behalf over and over again too.
I used to read on my iPhone before bed every night. I liked the consistency of it... But recently I have been reading out of my (very badly torn) Bible with a pen and highlighter in my hand, during the day. It is less routine, but I find I get so much more out of it! I love to go back and read what I underlined, or highlight the repetitions. I also like reading the study notes on the bottom.
I hope I can catch up in the next few days, and that I can keep it up for nine and a half more months!
Subscribe to:
Posts (Atom)