Showing posts with label DIY. Show all posts

Monday, March 12, 2012

DIY Kindle Cover (try two)

So I had so much fun making the owl Kindle cover, I wanted to try another one! One of my coworkers has a kindle so a made one for her. I am pretty pleased with the way it turned out.

I made a few changes, but not too major. I made the pocket vertical this time, and I topstitched along the diagonals of the corner pieces. All in all successful I'd say.

Saturday, March 10, 2012

DIY Owl Kindle Cover Tutorial

I have been meaning to make a Kindle cover for my sister-in-law for months now. But it has taken me a long time to figure out the measurements for it. I am excited to say, I DID IT!! It is finished! and I am very pleased with how it turned out!!


I searched and searched the internet, Pinterest, blogspot, blogger... everywhere to find a good tutorial for a Kindle cover. But NONE could be found. I think everyone wanted to save their secrets to make money selling their covers...  So- after all the laboring, (and failures of covers too small) I thought I would share with the world the steps of how I did it, so maybe someone out there wouldn't have to suffer as much as I did trying to find measurements!! I wanted a cover that had some padding, but also a cardboard inside. Also I wanted a velcro side closure, and a bottom pocket, instead of the side pockets I saw on many covers. So I kind of gathered little helpful hints from various sources and compiled them.  I'm kinda a big believer in "a picture is worth a thousand words" so this post has way too many pictures, but hopefully the instructions are clear enough to follow.
If you try this, or read this, or find this helpful, or find this confusing... Your comments are welcomed! Please, let me know how I can improve this post! I am still learning this whole blog/tutorial thing!


Materials:
-two different prints of fabric (that coordinate)
-thread
-velcro (i bought velcro sticky squares from a craft store)
-padding of some sort (i used a piece of scrap fabric, that was a microfleece, so mine is a bit smaller than that)
-cardboard (I suggest using the inside of a three ring binder, it is stronger and thinner than regular cardboard, without the bubbles of air in it.)
- and of course a sewing machine and some determination!

Getting started:
You will need to cut out the following pieces:

A: 8 1/2 inches x 11 1/2 inches   (cut 2 of main fabric, 1 of "padding" fabric)

B: 8 inches x 5 inches (cut 1 of complimentary fabric)

C: 8 inches x 1 1/2 inches (cut 1 of complimentary fabric)

D: 3 inches x 3 inches  (cut 4 of complimentary fabric)

E: 7 5/8 inches x 5 inches (cut 2 of cardboard)


Strap and Velcro Construction:
1. Fold Piece C in half to find the middle, place rough velcro square on the fabric (about 1/4 inch from the fold)
2. open up the fabric and sew around the edge of velcro.


3. Fold in half, right sides together and sew top and bottom edges with a 1/8th inch seam allowance.


4. Turn strap right side out. (I use a pin to pull the corners out as far as I can)
5. Finish edges by sewing a stay stitch around edges to make strap lay flat. Your strap should now look something like this:


6. Sew soft Velcro square to outside piece A, 2 inches from right side, in the middle.


Pocket construction:
1. Fold piece B in half (hamburger style), right sides together. With fold on top, sew down the right side.

2. Turn fabric. With right sides out and fold on top, sew a topstitch/staystitch along the fold and right side seam.


3. Match bottom and left raw edges of piece B to bottom left corner raw edges of inside piece A(NOT the A piece that has the velcro on it)  (right sides both up)

4. Stitch-in-the-ditch (sew following topstiching line) on the RIGHT SIDE of the pocket only.


Corners Construction:
1. Fold two D pieces in half diagonally, right sides together. Sew ONE raw edge on each with 1/4 inch seam allowance.  


2. Turn right sides out. (again, I used a pin to pull out the corner/point as far as I can.)

3. Match top and bottom raw edges to piece A. Measure so that seamed edges of D pieces are 6 inches from right side of piece A. Sew (1/8 inch seam allowance) down left sides of D pieces.


4. Fold remaining two D pieces in half diagonally WRONG sides together.
5. Match raw edges/corners to right two corners of piece A. Pin.


Putting it all together:
-Layer the pieces in the following order bottom first:

1. Inside piece A (with pocket and corners attached) RIGHT SIDE UP
2. Strap, piece C (with velcro side down and to the left) raw edge should stick out of the right side of piece A about 1 inch, center up and down.
3. Outside piece A (with velcro piece attached and on the left side) RIGHT SIDE DOWN
4. Place lining on top. (mine does not match in size because i used a scrap piece.)


- Pin, matching edges (again, my padding piece is smaller because it is a scrap) (except for strap piece, mine is a little crooked in the above pic)
- Starting at the top in the center, moving to the right, sew around the outside with a 1/4 inch seam allowance. (I match the edge of the fabric with the edge of my pressure foot).


-Stop when you get to the top left corner, so you leave a hole on the top left half of the cover.
- Clip the corners of your seam allowance, so it will lay flat better.
- Turn the cover, so right sides are out!

You are so close!! Just a few more things!

Finishing Touches:
1. I rounded the outside corners of the cardboard, just to make them fit a little better.

2. Insert the cardboard pieces in through the hole on the top left of the cover.
Place them in-between the outside piece A and the padding piece.


3. This next step is kind of tricky, turn in the top open edge, and hand sew closed. I pinned it so it laid flat, then hand sewed it.


4. Finally, spread the two piece of cardboard as far to the outside edges as possible. Sew (stitch in the ditch) down the left edge of the two center corner pieces, making a line down the center of the entire cover. This will help keep the cardboard and lining/padding pieces in place.

5. If you would like, you can embellish with a button on the strap.


ENJOY!!!


Saturday, January 21, 2012

DIY - Watermarbling Nails Tutorial and Tips

My nails were chipping and I had a little time, so I thought I would try water marbling again. Last time I did it I struggled with quite a few of the steps, so I thought I would document the steps and write out tips I found most useful.

Supplies:
To start off you will need: A cup of room-temperature water, a couple colors of nail polish, toothpicks, tape and scissors. Today i just used two colors, pink and white.

You will need to first paint your nails with a base coat. I just used a clear base coat because i was using two solid colors (white/pink). Most people start out with a white base and use two other colors (like green and pink or something).

I usually put a paper towel under the cup so i have a place to set yucky toothpicks. Also, use a cup you don't care about, or you can throw away after, because it is almost inevitable, you will get paint on the cup.

After your base coat is dry, you will need to put tape around your nails. This is so you do not get nail polish all over your fingers. So the better job you do at taping, the better the edges of your nails will look.

I usually put one piece of tape along the cuticle (base of the nail) then i take one long piece that starts on one edge, the curls around under the nail and over to the other side. Tape all the fingers of one hand, then you can begin with the paint.

Dripping the Paint:
Next comes the fun, but potentially frustrating part. The goal is to make a target with your colors. Start with one drip of one color in the middle of the cup. Wait for it to spread out, then put one drip of the other color in the middle. Continue alternating until you have rings. Your colors should look something like this... but this one needs a few more rings.
Once you have a nice looking bullseye, take a toothpick and drag it through the paint to make a design. This can get interesting. It took me a number of trial and error attempts until i got some designs i liked. Eventually i got one that looked like this:


Once you get a design you like, get one of your fingers ready to dip. you can slowly turn the cup to reach the right place if you need to. Hold your finger above the place of the design you want:
Then dip the finger into the water, and hold it so the nail is just under the water- then DON'T MOVE!
With the nail still under the water, take a toothpick and clear away the extra paint still on the top of the water. Twist the toothpick to get as much as you can, and pull it off the surface of the water. (i just put it on the paper towel) Don't worry about taking too long on this step, because the design is already on the nail, and wont mess up unless you hit it against the sides of the cup.

Once the surface of the water is clean, you can remove your finger from the water. It should look something like this:

Continue this until all five fingers have paint on them:

Once you have finished with the paint, wait for them to dry for a bit. After they are dry, take the scissors and cut the tape right at the tips of your fingers:
Then you should be able to peel off the tape and do your other hand!

TIPS:
* If the paint isn't spreading:
This could be because of multiple things. First, it may have to do with the brand/type of nail polish you are using. Try using cheap nail polish. I started off using O.P.I. brand, and none of them worked, they were all too nice and too thick. I ended up going to Meijer and just buying some cheap bottles of thin polish. I used "Sinful Colors" and it worked out much better. Second, it could be your water is too warm or cold. I usually set a cup of water on the counter the night before to get it room temperature. If the color isn't spreading, you can lightly tap the rim of the glass to get it to spread.

* If you are having trouble dragging the toothpick through to make a design:
Sometimes when i dragged the toothpick through, the whole surface of paint came with it. This especially happens when the outside ring dries. You need to start dragging before the outside ring dries. It can be difficult to go slow enough for the rings to spread, and fast enough that it doesn't dry on you.
If you are struggling to get a "good looking" design, try pulling all to one point on the edge, this will create the waves, or you can pull in opposite directions to get a zig-zag effect.

* If you are having trouble getting the extra paint off the surface when your nail is under the water:
It may be that it is not dry enough. I usually blow on the surface of the water and it dries pretty quickly. It should stick to the toothpick and come off in a filmy, saran (plastic) wrap looking glob. if the toothpick still isn't catching it, you could use a Q-tip.

* If there is a build-up of "gunk" on the surface of the water:
This can affect how the paint spreads. If there is too much i usually just drop on drip of paint on the water, wait for it to spread, blow on it to dry it, then take it off with a toothpick. It sort of clears the surface. If this doesn't work, then you might just need a new cup of water.

If you are still struggling, or want some GREAT IDEAS of colors and designs, look up SimpleLittlePleasures on YouTube. Colette has some AMAZING videos that show you how to do it!


Wednesday, January 18, 2012

DIY - Sugar Glider Pouch


Today I thought I would treat my girls (our pet sugar gliders, Petrie and Pearl) to some new furniture!


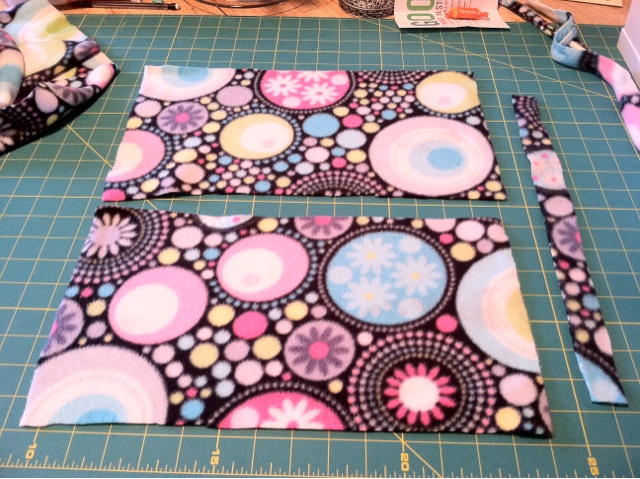
I started out with two large rectangles of fleece (I used 8"x14") and a 1" strip. I Folded the rectangles in half (hamburger style) right sides together. Sewed up the sides of both and trimmed the edges. DONT sew along the top! you should have one edge open, making two pouches.

Next I turned one right side out and put it inside the other. (so now right sides were together on both "pouches") I used 1" strips to make some loops, putting them in between the two before sewing them. (making sure the raw edges were matching, so the "loop" part was inside) I sewed the two together along the top edge, leaving about 2" unsewn to turn the pouch right-side out. Then I turned the pouch right sides out, and pinned the remaining two inches.
Next I top-stiched right along the top edge to finish the pouch (and close the last two inches)
And There we go! a finished glider pouch! Done  in no more than 15 minutes!
I think the girls are happy. :-)